Proper plumbing for a sump is one of the essential things that keep an aquarium alive and it is often overlooked. Whether you are an expert in aquariums or a beginner, the proper combination of hoses, pipes, and tubing can make a big difference in creating a water flow system that seamlessly supports your tank’s health and functionality. This comprehensive guide will take you into the world of aquarium sump plumbing and provide you with materials, tips on selecting the best ones for your setup, and installation advice.
What You’ll Learn: At the end of this guide, you will have a good idea of how to enhance your tank’s performance while staying clear of the common plumbing design pitfalls. Get set to upgrade your aquarium maintenance skills and make sure your underwater world not only survives but thrives!
Understanding Sump Systems
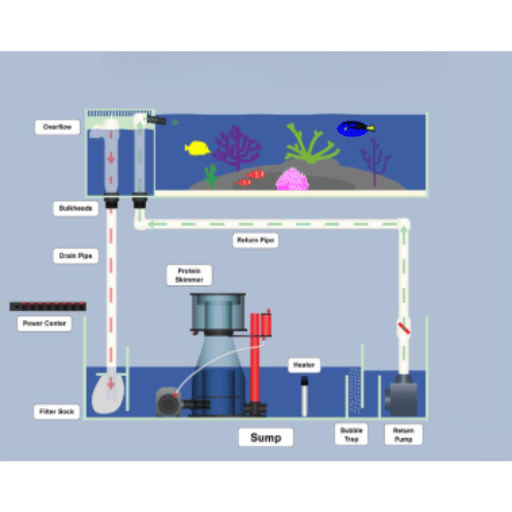
A sump system is an extra tank, usually situated under the aquarium, which serves to improve the water quality and to support the equipment. This configuration permits you to conceal the instruments such as protein skimmers, heaters, and mechanical filters which will result in a tidier exhibition. The sump systems increase the water circulation, oxygenation, and filtration, thus, they are the most important means to keep an aquarium with healthy fish. By disconnecting the equipment, sump systems not only give you more space for customization but also make maintenance easier.
What is a Sump and Its Role in an Aquarium?
A sump is basically a backup tank or reservoir situated under the main aquarium that is intended to boost the system’s overall operation. Besides supplying extra water volume, it also serves as a place for important equipment such as filters, heaters, and protein skimmers and it aids in filtration and oxygenation. A sump not only helps in keeping the display tank free from equipment but also provides a clean look and makes maintenance easier.
Components of a Sump System
A sump system is basically made up of a number of the main parts, which are as follows:
- Overflow Box – Moves water from the main tank to the sump.
- Pre-filter or Sock Filter – Traps particles and stops clogging in the following area.
- Skimmer Section – Contains a protein skimmer for the removal of organic waste.
- Refugium – A portion of the system set aside for beneficial organisms or macroalgae growth.
- Return Pump – Returns the cleaned water into the display tank.
- Heater – Keeps the temperature of the water in the system uniform.
💡 Key Insight: The interaction of all components results in a clean, healthy, and living aquarium ecosystem.
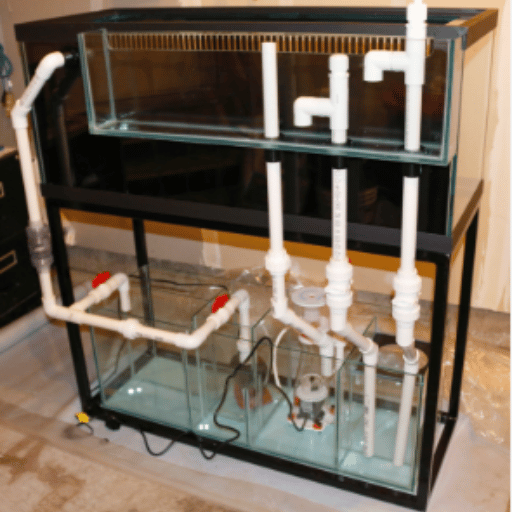
How Sump Tubing Fits into the Overall Setup
The sump tubing is the essential pipe that joins the display tank to the sump and returns the water, guaranteeing an uninterrupted flow of water throughout the entire system. It makes possible the movement of water between the different sections, thus, through effective filtration, temperature control, and nutrient removal, the whole system works in harmony. A properly installed and good quality tubing not only prevents leaks but also minimizes noise and helps the sump setup function smoothly like a main component of the aquarium ecosystem.
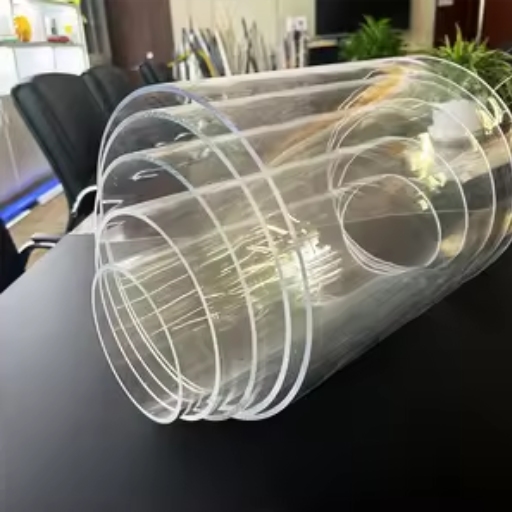
Types of Tubing for Aquarium Sumps
When creating an aquarium sump, choosing the correct type of tubing is a necessity for good water flow and system efficiency. Below are the types of tubing mostly used:
1. PVC Tubing
PVC tubing is strong, hard, and is most commonly used for the sump setup. It gives reliable water flow control and can be fitted with various accessories. Its hardness makes it ideal for long-term installations.
2. Flexible Vinyl Tubing
Flexible vinyl tubing is extremely adaptable and simple to work with. It is perfect for rounded or cramped areas where stiff tubing won’t be able to fit. Apart from that, it is see-through which makes it easier for users to keep track of the water flow.
3. Corrugated Tubing
This kind is flexible and resistant to kinking in the tubing so it is very suitable for complicated setups. Moreover, it might trap dirt in its edges causing it to need cleaning after some time.
4. Silicone Tubing
Silicone tubing is soft and flexible as well as durable. It is perfect for very calm water movements due to its sound-absorbing characteristics. However, it might not be able to cope with high pressure situations as well as some other options.
5. PEX Tubing
PEX tubing is strong and resistant to chemicals which is why it is used in setups with high durability. It is not as flexible as vinyl tubing but it is still able to cope with heavy conditions.
⚠️ Important Note: The choice of tubing will be determined by your aquarium setup, flow needs, and maintenance habits. Also, make sure that the tubing is safe for aquariums and compatible with the sump system.
Flexible vs. Rigid Tubing
The decision made of the two is mostly depending on system design, maintenance ease, and the preferred aesthetic.
Benefits of PVC Tubing in Sump Plumbing
- Durability: Won’t spoil or get damaged by chemicals, ensuring long-term reliability
- Lightweight: Very convenient to carry and install
- Smooth Interior: Reduces friction and promotes fast water flow
- Cost-Effective: Easily obtainable and inexpensive
- Versatile: Multiple uses and applications in aquarium setups
Choosing the Right Diameter for Your Tubing
💡 Key Factors to Consider:
- Volume and pressure requirements of your application
- Main water lines require large diameters
- Irrigation systems can work with small diameters
- Compatibility with current fittings and pipes
- Manufacturer guidelines for optimal efficiency and performance
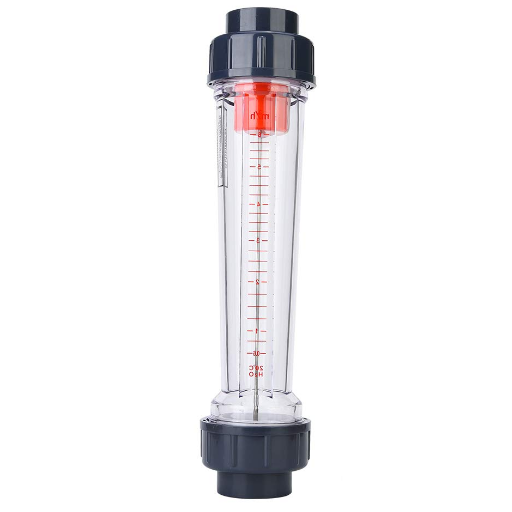
Essential Components and Fittings
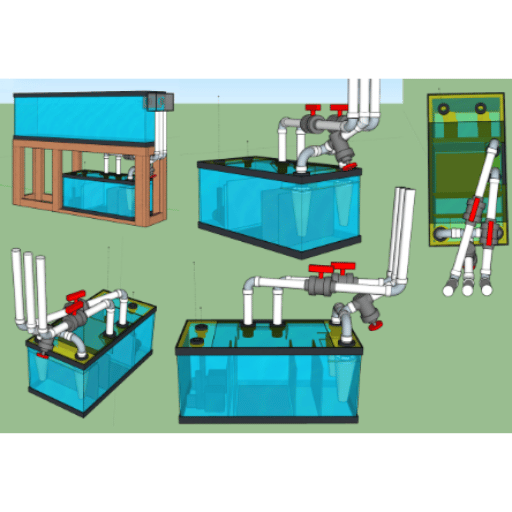
The plumbing system of your sump should be installed with the right parts and fittings in such a way that water would be able to flow efficiently and no leaks would occur. The list of the indispensable parts to think about is given below:
1. Bulkhead Fittings
They create a water-tight seal at the points where the pipes go through the tank or sump walls, thus stopping leaks from occurring.
2. Ball Valves
These are used to regulate the flow of water and thus you can very easily adjust or turn off the flow during maintenance work.
3. Unions
These kinds of fittings enable quick and easy disconnecting or connecting of pipes of cleaning or repairs without cutting the tubing.
4. Elbows and Tees
These fittings aid in the proper routing of water flow by allowing changes in direction or creating branching connections in the plumbing system.
5. Hose Clamps
They hold flexible tubing securely to barbed fittings and thus ensure tight and leak-proof connection.
6. Check Valves
They stop the flow of water in the opposite direction and hence protect your sump from being flooded due to pump failure.
7. Threaded Adapters
They make it possible to connect pipes and fittings of different threading types or sizes.
🔧 Pro Tip: Going for aquarium-grade components of the highest quality will be the guarantee of their long-lasting reliable performance. And as a rule, always, check for the compatibility of the components with your specific setup.
Understanding Barbed Fittings and Their Applications
Barbed fittings are made to provide a secure connection in the tubing systems, that are mostly used in aquariums and other fluid transfer situations. Their ridged and tapered structure tightly seals when the tubing is forced over the barbs thus reducing the possibility of leaks. Such fittings are suited for flexible tubing and are also suitable for low-pressure systems. Mainly the connection of pumps, filters, and overflow lines is the use case for them, as they offer a simple and trustworthy way to control the water flow intact. When choosing barbed fittings, it is important to ensure that they are made of the same material and have the same diameter as the tubing for them to work the best.
Types of Valves for Sump Systems
Choosing the right valves is of utmost importance when designing or maintaining a sump system as it ensures effective water management and system reliability. Here are some of the most common types of valves:
Each valve type is responsible for a specific aspect of water flow control, thus choosing the right valve is a matter of understanding the system’s requirements and operating conditions.
Importance of Bulkheads and Adapters
Water management systems couldn’t function without bulkheads and adapters, which are very important in making connections that are both secure and leak-proof. The bulkheads act as a firm barrier when water transfer occurs through obstacles such as tank walls, thus ensuring no water leakage and the system’s integrity. The adapters, in contrast, permit the use of different sizes or types of pipes, thus facilitating a continuous flow and granting the ability to operate in a more flexible manner. The combination of these parts not only improves the efficiency of the system but also leads to less maintenance and the eventual durability of the system. The right choice and correct installation of bulkheads and adapters are crucial for the best performance in different water flow applications.
Installation Tips for Sump Tubing

The proper installation of sump tubing is necessary for the maintenance of a trustworthy and effective system. By following these tips, you will have a smooth setup:
✓ Measure Accurately
First, measure the necessary tubing length to join your sump parts. Do not use excess tubing, as it will force the pipe to make unnecessary bends and slow down the flow even more.
✓ Secure Connections
Use the right clamps or fittings to tightly secure the tubing at all connection points. Test the seals during installation time to ensure there are no leaks.
✓ Avoid Sharp Bends
Place the tubing in such a way that kinks or sharp bends cannot happen, which may lead to reduced flow and increased strain on your pump.
✓ Select the Right Size
The largest water flow will be ensured if the tubing with required inner diameter specified by your pump and equipment is used.
✓ Test for Leaks
After the installation, let water run through the system and then check all the connections for drips or leaks very carefully. Fix the problem right away so it does not turn into a bigger issue causing long-term damage.
✓ Regularly Inspect Tubing
Inspect if the tubing is in the right place and it is not worn out or there is no algae build-up. Clean it or replace it from time to time to keep your performance at its peak.
✅ Success Tip: If you follow these steps, you will be able to create a system that does not leak and get the most out of your sump setup in terms of lifespan.
Easy Installation Techniques for Beginners
The installation of a sump system is not necessarily a complicated procedure. Here’s a step-by-step approach for beginners:
Step 1: Peruse the manufacturer’s manuals thoroughly to understand the parts and their arrangement
Step 2: Assemble the pieces mentally and check that they all fit properly
Step 3: Use appropriate tools like pipe cutters or wrenches for exact modifications
Step 4: Wrap threaded connections with Teflon tape or apply sealants for a snug fit
Step 5: Measure and mark lengths before cutting tubes and pipes
Step 6: Confirm positions once more before sealing parts permanently
If these methods are applied with patience and great care, the installation process will be much easier even for those who are doing it for the first time.
Advanced Installation Tips for Experienced Plumbers
Professional plumbers can gain from simplifying their process by planning the use of tools and materials in such a way that the time wasted is less.
🔧 Tool Optimization
- Utilize tools with multifunctional capacity such as adjustable wrenches and multi-purpose pipe cutters
- Keep a constant inventory system for easy access to materials
⚡ Advanced Techniques
- Pre-soldering connections for faster assembly
- Making use of flexible piping solutions for complex layouts
- Employing digital pressure gauges for accuracy in measuring
💬 Communication
Keep the lines of communication with clients open to mitigate problems and keep projects running smoothly.
Common Mistakes to Avoid During Installation
⚠️ Critical Mistakes That Can Compromise Your System
💡 Remember: If these pitfalls are avoided, then installers can make sure that the project is done efficiently, safely, and clients are happy with the result.
Reference Sources
- Cleaning Tips for Sumps:
A conversation about the cleaning procedure for sump pipes with the help of pumps, hoses, and filter socks. - Tank and Sump Maintenance:
Information about the correct maintenance of sump systems like filter sock cleaning and replacement. - Cleaning Sumps and Pipes:
The use of vinegar, citric acid, and specialized brushes as methods for cleaning sump tubing.
Frequently Asked Questions (FAQs)
What is aquarium sump tubing used for?
For filtration, heating, and other processes, sump tubing is used to connect the sump with the main aquarium enabling water flow.
What materials are commonly used for sump tubing?
Durable and water pressure resistant, flexible PVC, silicone, or vinyl are common materials for sump tubing.
How do I choose the right size of sump tubing?
The choice of size depends on the aquarium’s size and the pump’s flow rate. For compatibility, refer to the pump’s specifications.
Can I use regular tubing for my aquarium sump?
Although regular tubing may be cheaper, it is better to use tubings specific to aquarist so that they are not harmful to aquatic life and more durable to wear.
How do I prevent leaks in sump tubing connections?
Hose clamps or fittings may be used to secure the tubing and guarantee that a tight seal is formed at each connection point.
🌊 Ready to Build Your Perfect Sump System?
With the right knowledge of tubing types, essential components, and proper installation techniques, you’re now equipped to create a reliable and efficient aquarium sump system. Remember to choose quality materials, follow best practices, and regularly maintain your setup for optimal performance. Your underwater ecosystem will thank you!